
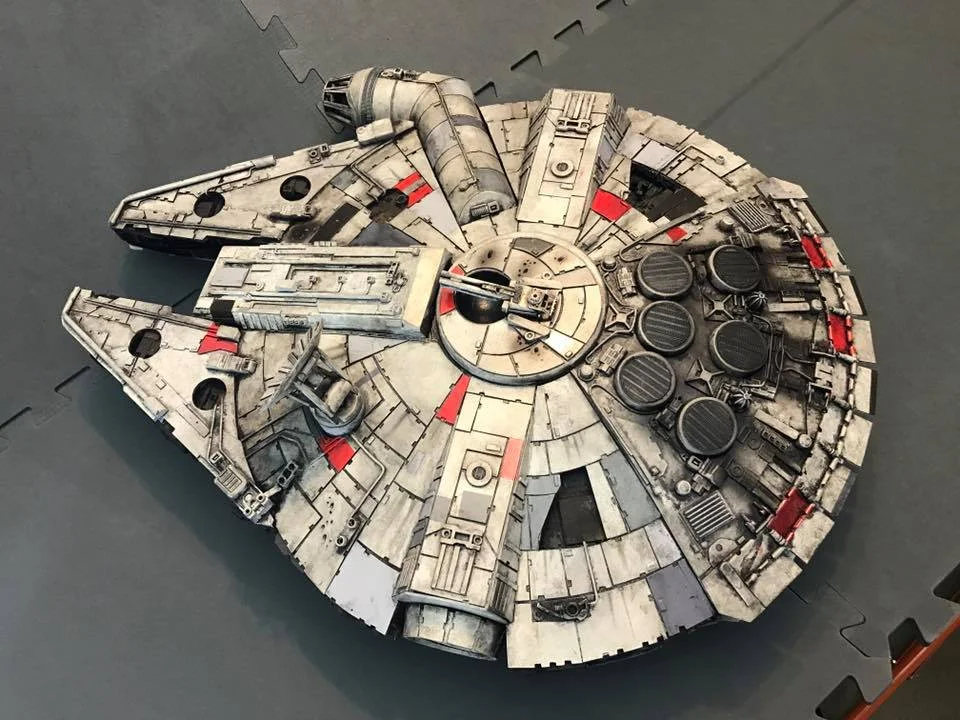
Building the Millennium Falcon from junk
So, after building the Enterprise from PVC pipe, plumbing parts, MDF and junk, I thought I'd try another.
All of these projects tend to start with the realisation that something looks like something else, and the Falcon has been no different. My starting point for this ship was this PVC vent cowling...

...which is very obviously a Falcon cockpit in disguise.
I didn't use blueprints for the Enterprise, because it was a basic enough shape to build from measurements alone, but the Falcon is a bit more complex and detailed. Googled some diagrams. Scaled them appropriately. Printed them out. Stuck a billion pages together. Yay, blueprints. (If these are your drawings and you don't mind me using them, then thank you! If they're yours and you do mind, then, um, sorry. Whoops?)
So the plan is PVC pipes for the pipe-shaped bits and MDF for the flat bits, then kinda make the rest up as I go along.

Blueprints with measurements and "cockpit" for scale.

Main shape is cut from MDF. Hull is two MDF sheets with some bits of 20mm timber in between like a sandwich. Had a heck of a time getting the "slot" that the tube goes into to work properly, but after a lot of filing and cutting and swearing, it slots in nicely.
The 50mm PVC vent cowl (cockpit) actually has an external diameter of 60mm, so everything is scaled from that. The bonus to using 60mm to measure from is that all of the round parts on the ship actually marry up to PVC pipe component sizes, so the circular cannon mount thingies in the middle are 100mm pipe caps (120mm ext. diam), and all of the round vent thingies on the rear will be 40mm PVC tube pieces.

The docking corridors (I'm making these names up as I go along) are getting built up to the right heights. I'm pretty much just "sketching" a shape here, trying to get all of the important parts to be a) fairly solid, and b) the right size.
Not entirely sure how I'll approach filling the ribs. Initial plan is expanding foam, then bondo. Failing that, EVA foam, then bondo (tedious to cut all the EVA foam up though, been there done that on the Enterprise saucer), failing that I might just make more ribs and skin the whole area with styrene. Who knows! This is an adventure.
I've added some extra pipe portions to the cockpit corridor. The piece on top appears to give the correct angle, I'm hoping it'll look "right" once the hull plates are snuggled up around it.
The round holes on the mandibles are bigger than they need to be (actually, the mandibles are also thinner than they need to be) because the whole front area is generously undersized to allow the surface to be built up with some layers of...whatever...to get the shapes and textures right.
My plan is to detail the entire exterior using whatever I can find that seems to look right, mostly junk, but we'll see what happens.
The only concession I think I'll make is that I usually don't use a lot of styrene sheet (because it's expensive), but I can't think of any other way to make a tonne of hull plates without losing my sanity entirely, so styrene it will be.
I'm at the point in the build where I start tearing out parts that I've already made because they didn't work so well, or because I came up with a better idea.
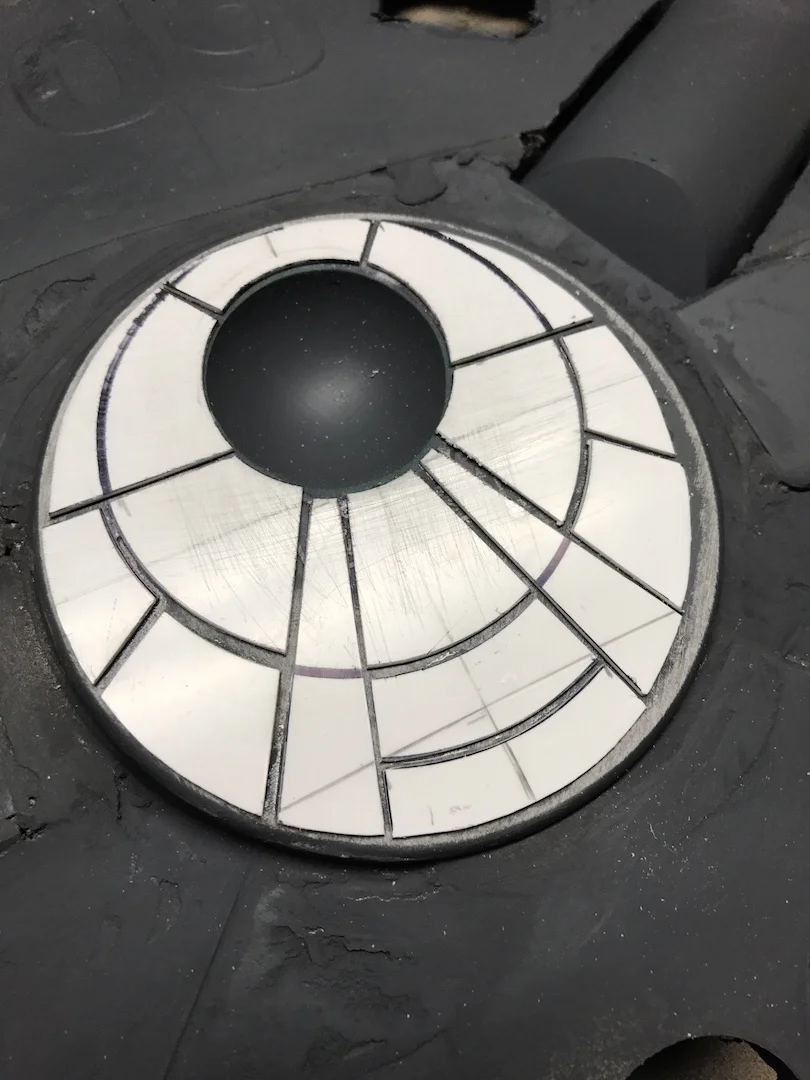
I wasn't happy with the "make ribs, fill with something" approach to making the dome shape, because I couldn't shake the feeling that there had to be something I could buy that was just the right shape. So I went hardware store hunting again.
BAM - a garbage bin lid. Obviously it has some issues, though. The centre part is raised. The total diameter of the curved part is not quite wide enough. And it has "60L" on it. Dremeled the heck out of it. Took the lip off, cut the centre piece out and re-insterted it without the offset. So far, so good.


I wish I had access to a laser cutter.....but I don't, so instead, I cut four pieces of tedious acrylic by hand, and messed about with them until they fit right. Also detailed the little round tubs on the mandibles with some USB thumb drive lids, lollipop sticks and cable ties for texture.

It's the 60 litre version of the Falcon.
I'm happy with the shape of the "dome". It's still rough, but it'll be covered with little styrene hull plates, so the texture won't be evident.

Mandible detail cut.

Primer.
We we have an engine deck. It's styrene, warped with a heat gun to the curvature of the bin lid, and raised above the surface on a few stacked strips of styrene. Worked fairly well. It has a few uneven areas due to heat gun brutality, which will require some filler later, but generally speaking, it's working quite nicely.
Dug some holes in the bin lid for the maintenance tubs, which will probably be detailed with chunks of old circuit board and piping from lollipop sticks and whatnot, but let's not get ahead of ourselves...
Messed about with the cockpit (plumbing vent) a bit. Filled in the lower "windows", added angled pieces to the upper windows. Still need to add some thin borders to the windows and some kind of glass. Drilled the end of the plumbing vent out, added a disc of styrene for the end windows. Decided to sacrifice one of the upper windows on the end of the cockpit for the sake of practicality, so there are three wedge-shaped windows on top, not four. I'm not losing any sleep over it.

Engine deck and further detail.
The plan is to cut panels to cover the larger areas (each "pie wedge" of the round part, etc), then mark the panel gaps on the whole piece with Sharpie, then cut on the Sharpie lines and file away the visible Sharpie, theoretically leaving a bunch of correctly shaped panels with fairly even gaps between them. At least, that's the plan.
I forgot to cut the little notches into the edges of the panels, but again, I'm not worried, it won't look out of place for the turret to be missing notches. I'll put notches on the main panels. Whoops.
The below photograph is testing a theory -- I'm considering using flattened out binder clips for the engine flaps. It's not accurate, but neither is a garbage bin lid. I think they convey the concept of "engine flaps" quite well.

Binder clip engine vanes.
Paneling the cockpit tube involves putting masking tape on the tube, drawing the panels, peeling the tape off, sticking the tape onto styrene sheet and cutting out the panels. Not as difficult as it initially seemed.
Circuit boards from an old cable modem make great greeblies for inside the maintenance wells.

Cockpit tunnel paneling.

Dish paneling and circuit board greebles.

Top jaw box made from MDF, styrene and miscellaneous greeblies. 100% completely inaccurate, and I actually end up deleting all of the surface detail and rebuilding it later. So, there's a minute of your time completely wasted. You're welcome.

Three exhaust vents completed.

The exhaust vents are made from the lids of these chewing gum containers, with cable tie "ladders" for the vent grilles.

From the sublime to the ridiculous: Texture and greebliness on the inside of the mandibles is provided by some clothes pegs.

Mandible panels.

Panels and pegs and greebs, oh my. These details are made up from cable ties (green and black bits), clothes pegs (red/green), parts from broken printers, cameras, clocks, some completely unidentifiable bits and pieces, USB lids, "lollipop sticks" from a craft shop, plastic bits from inside Nerf guns, circuit boards and no doubt many other things.

Primer makes it look a million bucks.

Airlocks. Not 100% happy with them, because they're hideously inaccurate and look kind of awful. (They look better with primer, but I didn't take a photo.) I might re-build them, depending on how much they annoy me. Still need to make some kind of conical bevel on the edges, I'll try to get that part right, at least.

A shot outdoors to reveal all of the detail and all of my mistakes!

Edge greeblies. Consists mostly of random unidentifiable plastic and metal junk. I spent some time wandering around the local garbage dump's "reuse store" collecting everything that looked tiny and interesting, so I have no clue what any of it is. The long green things are cable ties, the other green things are clothes pegs (surprisingly detailed on the posterior side, easily cut up, very handy). The aluminium things I believe are hardware for door or window rails, but I'm not 100% sure. The blue thing is an electrical cable joiner. Also a toy car wheel, and a few pieces of chopped up Hot Wheels chassis.

Newly rebuilt jaw box with much cable tie detail and solder piping. The surface has some awful texture from where I've torn the original greeblies off the MDF sheet...but it all adds character, I think.

Aaaaaand I've also torn down the engine deck and basically started over. Among other things, I found a bunch of tyre valve inserts (left of photo) at the local junk shop. Big ones and small ones. I used the smaller sized ones between the engine flaps, for now. I'd have preferred them centred on the flap, but I'm lazy and couldn't be bothered dremeling out a little channel in each of the steel bulldog clips/flaps. If I have to wait longer than I expect for my styrene sheet to arrive, I might still do that.
I also found some old electrical clips (the very deteriorated looking white and blue things) that seem like a reasonable approximation of a couple of kitbashed parts.
And I built the little panels that go behind the main vents using styrene, cable ties (of course!) and washers. I think they're a pretty decent facsimile of the "actual" parts. They'll look better when there are some pipes and whatnot going over them.

It's a dish! It's a dish made from the bottom of a plastic champagne glass (much like the dish on the Enterprise) and some of my favourite cable ties. Again, they seem to replicate the appropriate parts within a reasonable tolerance of accuracy. (One can only expect so much accuracy when one's satellite dish is a wine glass.)

Support structure for the wine glass -- legs and arms cut from acrylic, a felt tip pen lid (red) and an antique cable clamp.

Added window frames to the cockpit.

Some semi-accurate detail on the top of the docking corridor. The green and white bits are reasonably somewhat kind of sort of what they're supposed to be. The brass thing is actually an earring -- found two of them (earrings often come in pairs, who knew?) and thought they'd make some nice greebs. The round gizmo is a large washer with some cable ties (of course) behind.

That, my friends, is a quad laser cannon. It's a quad laser cannon made from junk, but regardless, it's a quad laser cannon. Styrene, lollipop sticks, tile spacing wedges, a USB flash drive lid, a gear and some plastic goodies from an old SLR camera, washers and of course.......some zip tie bits and bobs.

And now...............paint.
The plan, such as it is, is to paint the maintenance hatches and the entire equatorial greebly section matte black. The main reason I'm doing it this way is that this thing is made from so many different materials that I can't be super confident that the glue on the greebs will hold together once I try to cram black paint and black wash and dry brushing and weathering powder and who-knows-what else in there. So...starting with black makes that a WHOLE lot easier.
(Besides, it looks awfully sexy with the equatorial 'trench' painted black. Who knew?)

Base colour -- Rustoleum "Heirloom White".

Masking for the red parts of the ship.

We have red! The colour is "Hot Lips", with a random overspraying of metallic red as well, just for...variation. And because shiny is awesome.

Medium and medium-dark grey panels. First colour is "Windspray", which is actually a Colorbond fencing colour. I was delighted to find the can at the back of my spray paint shelf, as I didn't think I actually had four shades of grey to achieve the "correct" effect on the panels. Second colour is "Ito". Aren't you glad I'm telling you all of this?

Dark grey. Colour is called "Namadji", and verges on brown. I'm really happy that the "Windspray" is kind of a cool grey and "Namadji" is a warm grey. Gives it some variation and interest.
I've taken the masking off the maintenance wells, so this is about as "pristine" as the Falcon will ever be.

First, the exhaust vents need to be BLAAAACK. Masking took ages, but was worth it -- as masking often is.

Exhaust vents painted.

And there's our initial black wash. Now, it won't surprise you to know that I'm doing all of this 'wrong', and I'm not using expensive oils for my washes. All of the weathering is going to be done using acrylic paints (the kind that comes in tubes for a couple of bucks, school paint), some sidewalk chalk and the most outrageously expensive part of the whole weathering process will be a pack of artist's pastels. So...this should be interesting.
The first point of failure (sort of) has been the initial black wash. I forgot to include soap in the recipe, so there were some spectacular issues with surface tension and my wash retracting away from some of the greebs/edges/features. Oh well. We live and learn.


Panel detail. Weathered inside with artist's pastel and acrylic paint and water and whatever other stuff I could find to grunge it up in there.

And that, as they say, is that.

I ended up installing a row of LED Christmas lights into the rear, behind a strip of transparent USB thumb drive lids.
So that's how I made that. And now it sits in my garage and collects dust, alongside the Enterprise.